

Join us as we develop our TV and streaming shows. Whether you're new at homesteading, an old hand at it, raising a few chickens and vegetables, or working to get your family prepared for the next emergency,visit here for information from home to garden, emergency prep and all in-between.For the Country or Urban Homesteader or Micro Agriculture food gardener, no matter where you live. Part of the "Cattle Call Productions" family.
Wednesday, December 23, 2015
Friday, December 11, 2015
Hydroponics at Disney
When I go to Disney, I take the greenhouse tour every year. So many neat things going on there. It is also where I purchased my vanilla orchid.
This picture shows eggplant. Although this is hydroponic, my goal is to work in conventional gardening to get some of these same results for the home gardener.

Monday, December 7, 2015
Two Newest Books
Below are the two newest books of the Backyard Farming series. They may be purchased at any bookstore.


Tuesday, December 1, 2015
By Scent
Did you know that many times you can tell what type of citrus tree you have by the smell of the leaves?
If you have citrus and are unsure whether you have oranges, limes, etc., just pick a leaf, break it in half and smell. It will usually smell like the fruit that the tree bears. So far, it has worked for me when I've tried it.
Allspice
My allspice tree is looking nice, although it does seem to be a slow grower. I still haven't found out all the information that I need on it, the biggest being do I need a second for pollination. Some articles say yes, others seem to say no. And if I do need a male and female tree, which do I have?
The leaves do smell really nice, however. They have the allspice scent and may be used in cooking just like the berries themselves.
It is funny that, when I tell people that I have an allspice tree, they are surprised as they thought that allspice was a blend of spices!
I also have started some paddle cactus in the open space of the container. Love pickled cactus so the goal is to get enough paddles to make a batch.

Monday, November 30, 2015
New Logo
Actually, I've had this logo for a while, but it will be new to the blog. Unfortunatly, the entire logo will not show here, but it gives you a good idea!
Keep watching for the change!
Vanilla Orchid
Earlier in the year, I purchased a vanilla orchid culture at the Land at Disney World. This is my third attempt as they seem to be tricky, but so far so good at this point.
I do hope that it will continue to grow well and eventually get beans from it. (From what I read I will need to hand pollinate but that's ok!)
Although the plant doesn't look all that large, it started from a culture only a few inches high!

Friday, November 27, 2015
Visitor Count Vanished????
I wonder what happened to my visitor map? The count disappeared! There were thousands in the count and the map was full of location spots. Hmmm...... Sad as it was very interesting to see where everyone was from, all over the world!
Wednesday, November 25, 2015

Tuesday, November 24, 2015
Starting from Seed
I like to try starting things from seed. So, I thought I would try my hand at some citrus. My key lime tree is over a year old, and the smaller seedlings are orange trees.
I do seem to be running into a slight problem with the key lime, as you can see, some of the leaves are folding in on themselves. Usually means that something is up with it. Now I have to pin it down.


Monday, November 16, 2015
Drying Sourdough Starter
I have so much extra starter, like 3 quart jars full. When I have to remove some starter from my crock at "feeding time", I hate to throw it away, so I would just put it in jars and stick it in the fridge. I would then use it as back up in case something went wrong with my crock, use for giveaways, etc. However, not many people that I know bake bread, so it builds quickly. And the jars are taking up space.
As a result, I have begun to dry the starter, a jar at a time. It is easy to do. (Pictures below, in order of steps.)
I place parchment paper on a platter or cookie sheet. I then spread a thin layer of starter on it, set in an out of the way place (where no dust is flying and little kitty paws can't disturb), and just let it air dry. (Oven or dehydration heat can affect the yeast.) When THROUGHLY dry, I then peel off the paper (which you can reuse) and break into small pieces. You can store in pieces or grind into a powder, which will be what I will do next. Store in dry, airtight jar.
Note that I always make sure that the starter is active before I dry it. So the jar that I am drying the contents of, is kept out of the fridge, and fed once a day (sometimes every other day) until I have dried it all.


Tuesday, September 8, 2015
It's Alive! (Yay....)
In cleaning out the fridge, I found my sourdough starter. It has been in there for almost a year, but except for a bit of gray on the top (perfectly normal with all that sitting and no feeding), once that was removed all of the dormant starter was perfectly colored. So, I decided to see if it could be resurrected.
I took a few dollops out of the jar with a clean spoon, returned the rest to the fridge and placed the dollops in the crock that I had normally kept going starter in. I fed it twice a day for the last few days (1/2 c flour then 5/8 c water). As you can see , it is coming along beautifully. I'm planning on some good sourdough rolls soon!


Thursday, August 20, 2015
On Lilacs

It is too bad that lilac season is so early and so short. Not even around for the summer. I have a few lilac trees at 1840's Farm, but perhaps my favorite is the French. I love the color and the scent.
But, did you know that lilacs are edible? I had heard about a few things you could do with them, but hadn't looked too much into it until recently. The one thing that I have not tried as of yet, is a lilac sorbet. I have found that there are also lilac wines, honey, syrup and other things to make with the flower. So, next spring may be a bit busy. However, it will be difficult to cut those flowers off, as I do enjoy seeing them in the yard.
Wednesday, August 19, 2015
Pineapple Update
Well, we have the final piece for the pineapple that we have been watching.
It was harvested (and I forgot to take a picture....) and was so sweet. Now, the pineapple has finished one chapter and started a new one. The top is now going on to become a plant on it's own.

New Link Upper Left
Please take a moment to look at a new link just added about canned hunts. Please be aware that I am not against hunting for food (this does not include for things like shark fin soup), but coming from a hunting family, you took only what you would be eating and would use as much of the animal as possible. You did not trophy hunt, you did not participate in a canned hunt, you did not hunt for the enjoyment or thrill of it and you did not hunt because you though a animal part was some sort of aphrodisiac, or some other ridiculous excuse. If you didn't have a good shot, you didn't take the shot, at the risk of an unnecessarily cruel outcome for the animal. But that said, if you did have a good shot, took it and the animal still ran, you tracked the animal and found it, not just walking away for the next "target".
And you always kept in mind that you were taking a life in order to feed the family, not just shooting at some "thing". And you were grateful and respectful to the animal.
And you always kept in mind that you were taking a life in order to feed the family, not just shooting at some "thing". And you were grateful and respectful to the animal.
Tuesday, August 11, 2015
They're Coming
The wild grapes are begining to turn. They seem to be good sized this year. However I think the birds are beating me to them as alot of them disappeared while still green!

Saturday, August 8, 2015
Flea Trap Hack
For anyone who has a flea trap, you probably already know that they work like a charm and can be a great alternative to sprays.
However you probably also know that the sticky papers that trap the fleas can get a bit expensive, especially if you're unfortunate enough to be dealing with an infestation. And of course there is the random tail that gets stuck to it as well.
This year, in dealing with some fleas, I again pulled out my flea trap. However, I was out of sticky paper. Then I remembered reading something about putting petroleum jelly on a cat's neck if the fleas run up to the head after giving the cat flea drops. The fleas are supposed to get caught in the jelly and die.
...BRAINSTORM.... I decided to smear the tray, where the sticky paper normally would go, with petroleum jelly instead. I did both the bottom and the sides of the tray. WORKS GREAT!!!!! And no sticky paper to stick to unattended tails and nosey little paws. To clean, I just wipe out with a paper towel and reapply the jelly. And, your using something that you probably already have in your medicine cabinet.

Monday, July 6, 2015
I'd just like to take this time to thank the 1000's of visitors that we get here at The New Century Homesteader blog. It has been a busy spring and summer already with writing, meeting deadlines, getting berries picked, cleaning out, looking for sponsors, etc.
Please keep dropping in. There will be new posts, new little projects, some FYI's and other random farm, garden and food thoughts!
Please keep dropping in. There will be new posts, new little projects, some FYI's and other random farm, garden and food thoughts!
Berry Time!
The wild berries ripening are all over 1840's Farm. I'm getting these ready for the freezer. I like to spread them out on a cookie sheet first and let them freeze a bit, just so they don't freeze into a giant berry block. Then I'll bag them for pie making later on when I have the time.

Wednesday, July 1, 2015
Getting a Small Garden Ready
Sometimes you only have time to put in something small. But they can still have a bit of character. I love the little old mini barn at the 1840's Farm. My mom actually used to keep her horse in it when she was a kid.

Tuesday, May 19, 2015
Lunch
Yeow.....was doing some research in St Augustine for a book and stopped for lunch at Meehan's Backyard Island Cafe. Ordered the Monster Burger. HUGE....but so delish! Slaw, goat cheese, bacon.....not something you'd have daily (or weekly) but what a treat!


Saturday, May 9, 2015
Pineapple Update
Checking in on the little pineapple that we have been following on Facebook, it is now actually looking like a pineapple, albeit a "mini me" version. Still a long way to go.
The plant itself is also beginning to sprout "pups" (second pic). These are new little plants forming that will eventually produce a fruit themselves. This plant has 2 "pups starting so far.
A pineapple plant fruits only once.


Tuesday, May 5, 2015
Home Made Garden Posts
A fron came off of one of the coconut palms the other day during a heavy wind. I have been trying to decide what type of support to use when I transplant my vanilla orchid. (Yes...the same plant that can produce vanilla pods.)
This morning, as I was moving the downed fron, I got to thinking that I could put at least part of it to good use.
So.....I cut off either end of the fron, leaving the center stem at the length that I desired. Then, I cut the leaves from the stem. Sealing the 2 cut ends, the stem is now ready to use as a plant support. Because I cut this one long, I will be using it for my allspice tree, replacing the shorter supports. (Replacment in progress in last photo.)
Oops....just heard another fron go down in the wind. This one will be for the vanilla orchid!


Sunday, May 3, 2015
Interview Tomorrow
I will be on the Sharon Kleyne Hour tomorrow, May 4th, at 1pm EST. The scheduled topic of discussion will be growing a garden in small spaces. I hope you will be available to listen in!
Friday, May 1, 2015
Tree Frog 911
This morning we found a tree frog in the screen room, very dehydrated. In fact, we thought he was dead. Then, when we picked him up, he showed a VERY tiny bit of movement. So, I put him in a shallow bowl of room temp water, periodically spooning water over his entire body and being careful not to get his little nose submerged.
A little more than 3 hours later, this little dude went from death's door to what you see below. He is now enjoying life once again, in the garden.


Monday, April 27, 2015
Plumeria Blossoming
The Plumeria, or "sticks" as we affectionately call them, are blooming. At least one is.
I just found out that, although the rest of the plant is toxic, the blossom is supposed to be edible. Anyone with experience in this?

Sunday, April 26, 2015
1 Tbsp. Of Egg....
Click on to my Facebook page (see the button on the top left of the page), for a neat little FYI on eggs.
Saturday, April 25, 2015
Don't You Just LOVE This Coop?
I couldn't resist posting one of my favorite chicken coops. Yes, it is actually a float in the Easter parade at Magic Kingdom, but who wouldn't love it in their yard filled with the little cluckers?

Thursday, April 23, 2015
New Hatchlings
Some photos I took of a few hatchlings, but not the type you think. EPCOT has a small, enclosed butterfly garden on site for the Flower and Garden Show, and it is so interesting to see the various stages.
One of the photos shows a butterfly in the process of hatching. Can you find him?


Tuesday, April 21, 2015
Tomato Time
Just processed 22 lbs of fresh picked tomatoes into sauce. So good!
Did you know that an easy way to peel tomatoes is to drop them in boiling water for a few minutes? The skins will crack. Then drop into a bowl of ice water for a minute or so. When you pull them out of the ice water, the skins will peel right off with your fingers, many times in a single piece. (Caution....tomatoes may still be hot even after ice water dip.)

Friday, April 17, 2015
Urban Farm at EPCOT
Posting a few more pictures from the urban farm at EPCOT. This really was in a very tiny space, but showed nicely how you can still have room for so much.
I can't wait to get this all going for my show in the Keys!


Thursday, April 16, 2015
Urban Farm at EPCOT
I went to the Flower and Garden show at EPCOT a little over a week ago. I was very excited about the small urban farm display that they had.
I will be posting some pictures, but what I found most interesting was the aquaponics set up.
I tried getting panoramic pictures of it, but kept getting people's heads in it, even when they tried to duck, so I had to go piecemeal. But you can get the idea.


Wednesday, April 15, 2015
"My Garden Post" Test and Review
I am having the opportunity to try (and review) "My Garden Post", a vertical gardening system. Not only can it fit in a small area, but if you purchase the drip irrigation system with it, it will help you with your watering. When you find the right drip/watering (time/frequency) setting for your system, it can be one less thing in the garden you have to worry about. It was easy to put together, and has held well in heavy rain and wind (although in a REALLY bad wind, I would secure it just as you would any other free standing entity in the yard). It is also pretty easy to move from one spot to another, even on an outdoor brick patio, with filled pots.
It was very easy to assemble and except for one point, which will be pointed out in the photos, one person could do it by themselves, and even at the point of slight difficulty, one person could figure out how to manage.
Take a look at the pictures, from start to finish. I have posted captions to help describe what is going on, although it is all pretty much self explanatory. (Note that I had help only so that I could take the photos....Thanks Dad!)
 Here is how the "My Garden Post" shipped. Nice, sturdy box with handles on the sides for easier caring. I didn't see who shipped, but I believe it was UPS.
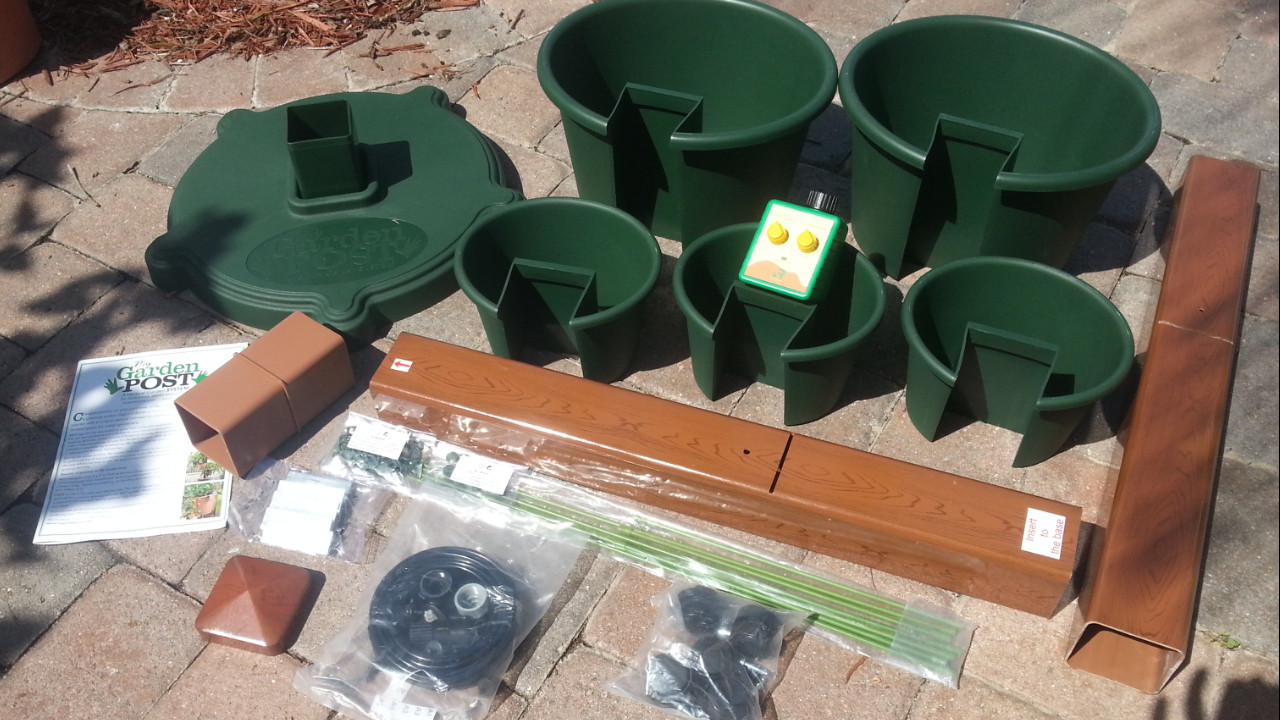 The contents of the box, all laid out. It looks a bit more complicated than it really is, so don't worry if you are "assembly challenged".


First, I had to put the wheels on the base. The wheels were a bit hard to push in, so if you have problems with your hands, you may need someone else to do this for you. One wheel has a wheel lock.


Next, we need to pull out the parts for the post assembly and cut the enclosed tubing to the required lengths (if you have the drip irrigation). All the lengths are given to you in the manual, and the tubing is easy to cut with a sharp knife. And you get plenty. The roll in the upper left corner was what I had left, so there is some room for error.
 Next, you need to thread each tube through the corresponding holes in the post. This is all quite clear in the manual. However, this is also the point where you may need an extra hand for a few minutes, so that one can pull the tubes through while one pushes them in through each opening.


Next, we put the post together. You can see where the drip tubes are located.

 The post is now inserted into the base with all of the tubing coming through the bottom of the base. The tubing is then threaded into the little notches that will hold them in place. They snap in easily.
 The mounted post with drip tubes and the hangars added which will hold the plant containers.
 Attaching the pots to the post.
 The completed post! And did you notice that, except for the knife to cut the tubing, no tools were required!
 I have begun to moderately fill the pots. The top pot will be packed further, the second from the top is loaded with lettuce and basil seeds that are sprouting like crazy. I have put in tomatoes, eggplant, peppers, kale, oregano, chives, cilantro, nasturtiums, globe basil, strawberries and more to be decided as a few of the pots grow a bit more and I see what I have in space. You really can pack these!
Well, that is my experience so far with the "My Garden Post" vertical gardening system. The only thing that I don't have hooked up yet is the drip system, as I need to figure out how I want to hook it up with the other hoses and Y's. It does work, however, as I did unhook one of my hoses and hooked this up to see what happened. So for now, I hand water.
Although I put all edibles in my set, you can put in decoratives as well. All in all, if you have not much space, this could be a great solution for you. It is also is a great solution for those with physical limitations.
If you're interested in the "My Garden Post" system, just hit my affiliate button on the right side of the page. And if you decide to buy, you'll get a discount (using either the button or my code).
Have Fun!
It was very easy to assemble and except for one point, which will be pointed out in the photos, one person could do it by themselves, and even at the point of slight difficulty, one person could figure out how to manage.
Take a look at the pictures, from start to finish. I have posted captions to help describe what is going on, although it is all pretty much self explanatory. (Note that I had help only so that I could take the photos....Thanks Dad!)
First, I had to put the wheels on the base. The wheels were a bit hard to push in, so if you have problems with your hands, you may need someone else to do this for you. One wheel has a wheel lock.
Next, we need to pull out the parts for the post assembly and cut the enclosed tubing to the required lengths (if you have the drip irrigation). All the lengths are given to you in the manual, and the tubing is easy to cut with a sharp knife. And you get plenty. The roll in the upper left corner was what I had left, so there is some room for error.
Next, we put the post together. You can see where the drip tubes are located.
Well, that is my experience so far with the "My Garden Post" vertical gardening system. The only thing that I don't have hooked up yet is the drip system, as I need to figure out how I want to hook it up with the other hoses and Y's. It does work, however, as I did unhook one of my hoses and hooked this up to see what happened. So for now, I hand water.
Although I put all edibles in my set, you can put in decoratives as well. All in all, if you have not much space, this could be a great solution for you. It is also is a great solution for those with physical limitations.
If you're interested in the "My Garden Post" system, just hit my affiliate button on the right side of the page. And if you decide to buy, you'll get a discount (using either the button or my code).
Have Fun!
Subscribe to:
Comments (Atom)